Why would you choose to use a spindle press rather than other tools? And what is there to know about using such a press? Here's what a spindle can do and how it works.
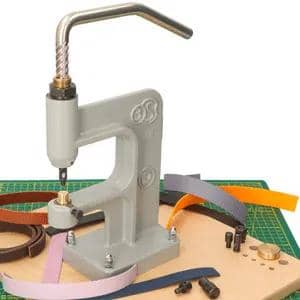
Do you regularly work with leather, biothane or webbing? Then you may have heard of a "spindle press" or "hand press" tool. With this tool you can make holes in materials such as leather and biothane, and you can also easily secure rivets or snap buttons.
Just want to know how the spindle press works? Then go straight to the video at the end of the article.
What do you use a hand press for?
A spindle press has several functions. In the dog and horse world it is mainly used when making collars, leashes, adapters and halters.
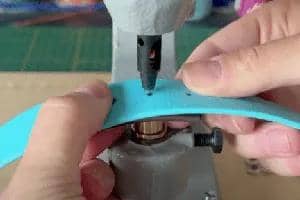
With the spindle you make the holes in the leather or biothane, to subsequently fasten the rivets, snap buttons or eyelets with this same tool.
The spindle press is also used when making belts and bags, for example. Here, too, it is a matter of easily making the holes and securely attaching the matching accessories.
Advantages of a spindle hand press
Using a spindle instead of separate punches has advantages. Here are a few of them.
Easy to use
Working with alternative tools such as a hole punch or rivet punch requires some experience. It can take quite a bit of time and strength to make the holes and attach the rivets in a safe way.
With the spindle, the only thing you have to do is pull the handle to the side and then the hole is punched or the rivet fixed. It is very simple and it saves time.
Requires little force
This spindle hand press is not only convenient and time-saving, but is also very accessible because little force is required. If, for example, you have less strength in your hands, it is easier to work with this press instead of the regular punches.
Spindle press is very precise

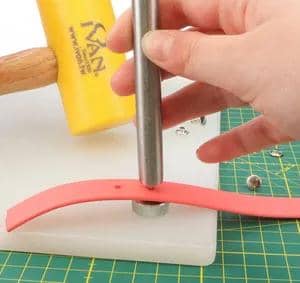
Tightening rivets by hand is often not easy. You then use a hammer, punch, anvil and cutting board. And then you also need to have enough strength in your arms and have mastered the correct technique.
With the right technique, it is certainly possible to attach rivets by hand. However, working by hand is more error-sensitive and the rivets may become crooked.
When the rivets are attached crookedly, the force exerted on them is not evenly distributed. As a result, they can loosen more quickly. In addition, dirt can get in more easily, which means that a slanted rivet can also oxidise more quickly.
With the spindle, you don't have this problem. The hand press does all the work for you and the rivet will not easily get slanted. This is also practical when you are a bit clumsy: you can't hit your own hands anymore ;)
Safe and secure fastening
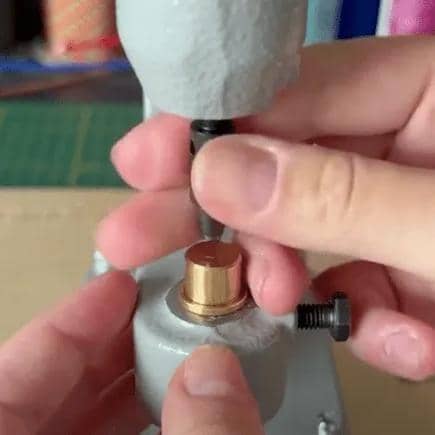
When you use the spindle in the right way and with the right accessories, you can attach rivets safely and securely. Because the spindle exerts a downward force and you use the right rivet accessories, the rivet is pressed together in exactly the right place.
With the hand press, it is easier to fasten the rivets with the same amount of force and in the same way every time with the controlled ‘swing’ of the lever.
By hand, you will not be able to fasten the rivets in the same way every time. For example, one time you might give a solid hammer blow with a force of 270 kg, while the next time it will ‘only’ have the force of 200 kg. This is therefore not as consistent as when you use a spindle press.
Disadvantages of a hand press
Using a spindle provides a lot of convenience, but it also has its disadvantages. These can cause you to prefer working with separate punches after all.
Purchasing costs
Buying a spindle, together with all the necessary accessories, is an investment and is pricier than buying a rivet punch and a hole punch.
But the investment can be well worth it if you frequently work with Biothane and leather. In the long run, you will save a lot of time when making your products and you will notice that the rivets will almost always be correctly attached.
Difficult to move around
A spindle is heavy (about 3 kg) and has to be attached to something. This makes it difficult to move it around. Working in different places with this instrument is therefore challenging.
Must be fastened
The spindle must be fastened in order to function properly. If it is not fastened tightly, you will hardly be able to apply any force because the spindle will move along with you.
Many people choose to take an old, wooden board and attach the spindle to it with screws. This board is then attached to a table.
Because it is not always practical to have to make a fastening system yourself, we have designed our own 'Spindle Station' with which our hand press can be attached.
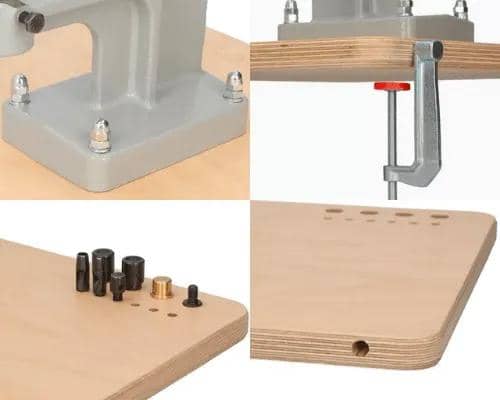
Advantages of the Spindle Station:
- Table or workbench will not be damaged
- Pre-drilled holes and included screws for easy spindle attachment
- Notches for convenient storage of spindle accessories
- Sleek appearance and smooth finish
Changing accessories in between
You will usually use the spindle for two purposes: making holes and fastening rivets. For these two functions, you need different accessories on the spindle. This means that you have to exchange them in between.
Do you use the spindle sporadically? Then this will probably not be a problem for you. When you use the spindle intensively, it can become annoying and cause you to lose time.
In that case, you can consider using two spindles, leaving the accessories in place and using one to make the holes and the other to attach the rivets.
Tips for using the spindle
Tip 1: Use an extra layer
To make sure your anvil lasts as long as possible, it is best to use an extra layer of biothane or leather when making holes. Simply place a leftover piece of leather or biothane under the material you are making the holes in.
This makes the hole punch die less likely to make contact with the anvil, which means that both hole punch die and anvil will wear out less quickly. The hole punch therefore also becomes blunt less quickly. It also makes it easier to go through the top layer, as the layer underneath bounces along slightly.
Tip 2: Don't pull too hard
Do not pull the handle too far when fastening rivets or other materials. If you do, you may get a permanent impression in the biothane or leather.
Practice will tell you when to stop pressing so that the rivet is firmly fastened without damaging the material underneath.
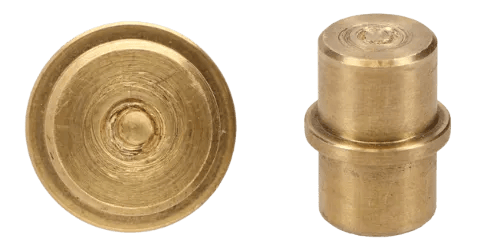
Tip 3: Use the correct sizes
It may seem obvious, but still: use the right-sized accessories. This will prevent you from damaging the materials unnecessarily.
Are you using 10 mm wide rivets? Then make sure that you use a rivet die set for 10 mm. A rivet die set that is too small could cause the rivet to break or tear.
Spindle press manual
Now on to the real work. How do you get started with this tool? You can see it in the videos below.
Materials used in the videos: